
A few years ago, I made a small (12” high) stand/pedestal for my bass cabinet – documented it in this thread. At the time, I wasn’t gigging, so I made it ultra solid, without the slightest concern for weight. Later I joined a bar cover band that works most weekends and found the stand to be heavy, and not as tall as I would like. Eventually I moved to using a Quik-Lok WS-540 stand, which was taller (24” , but often seems almost too tall. Also, as an adjustable stand, it has a tendency to feel rickety.
I do like to use a cabinet stand. I mainly play in small bars on tiny stages and am frequently forced to stand literally right in front of my amp. Being somewhat tall (6’3”, this positions the cab drivers to face the back of my knees. Since my bass is not run through the PA (small club), I have a tendency to turn the bass up when I can’t hear it as well as I’d like, and it thus gets to be too loud in the mix. I like a lot of bass in my mix. So a cabinet stand gets the cab up closer to my ears and helps me hear the bass better. While I lose a tiny bit of deep bass from moving it away from the floor, I can easily compensate for that with my EQ.
I’m not what you would call an “experienced woodworker,” but I do have a drill press, table saw, router, etc. and know how to use them, and I’ve built some things before, so I decided last week to have a go at making a better cabinet stand. I found a whole bunch of select solid poplar 1”x2” and some poplar 2”x2” pieces left over from another project, as well as some scraps of ½” thick plywood in good shape, so I didn’t have to spend a lot of money either.
I spent a while thinking about what I wanted in a stand, and decided that I’d like it to be taller (18” or so), lighter weight, but still just as sturdy as the first one, and that I would like it to have a power supply on the back. I don’t carry a power conditioner in my rack, and I thought it would be nice to mount a Furman power block on the back for all my gear to plug into. I also wanted to leave the front open so I could use the area under my cab for storage (space on those tiny stages is at a premium!). I’ve asked the drummer (graphic artist) to make a tapestry or something with one of the band logos to hang over the opening, and that will cover the front of the unit.
I began by cutting out a piece of plywood to match the footprint of my largest cab – which turned out to be 23” wide by 16” deep. Then using #10 screws, I attached a rim of 1”x2” poplar, arranged vertically, around the edge of the top plywood piece. Once the top was done, I cut out the “legs” of the stand from 2”x2” poplar, making them 18” long, which gave me a total height of just under 19” for the stand. With a Auralex Gramma Pad (fits perfectly on top), it can be 21” tall.
Once the legs were done I ran another rim of 1”x2” poplar (again arranged vertically) around the base of the legs to secure them. I rounded the edges of these poplar pieces over with a router so they could serve as “handles” when the stand is upside down (i.e. in transport). Then I screwed in another piece of 1”x2” poplar across the back to give me a place to mount the Furman. Using some scraps, I built up some pieces so that I could recess the Furman into the back somewhat (so it didn’t stick out much), and I used a brass corner brace (which swivels on a screw) to secure the Furman onto the screw mounts I made.
Lastly, I attached some plywood pieces (rounded over with the router) to make the back and sides. Here are some pics from after I’d finished the basic assembly, but before I’d filled in the countersunk screw holes and cracks and started sanding, showing the robust construction using screws:
Looking at the front:
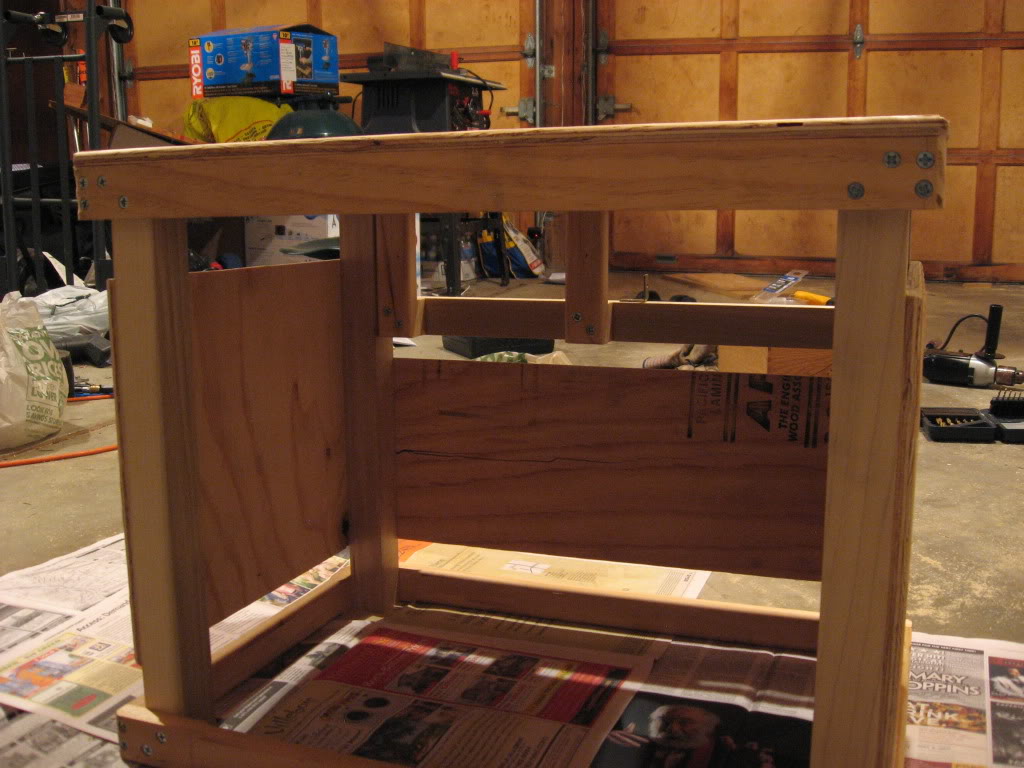
Looking at the back:

Then I filled in the screw holes and cracks with wood putty, sanded it down, and attached some rubber feet to the top and bottom.
Here’s how it looks now:
From the front:

Showing the mount for the Furman on the back:

With the Furman installed:

Showing the Furman recessed:
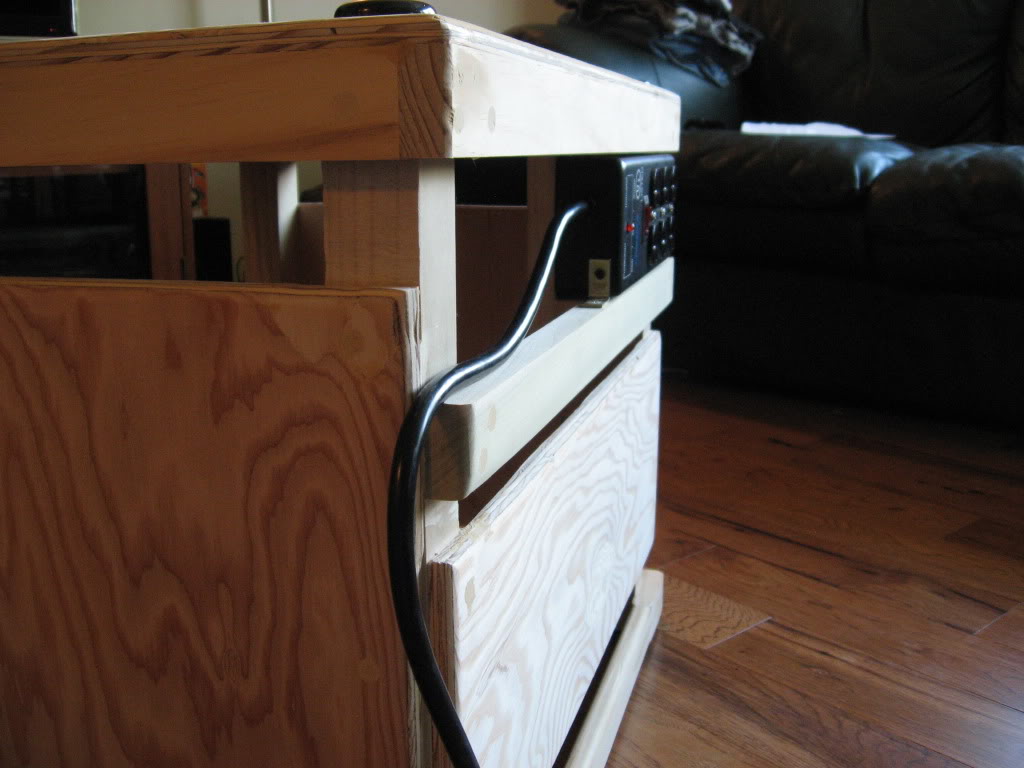
Showing the top, looking at the back:

Upside down, ready for transport:

With a cab on top, and the old stand next to it:

I have some Duratex paint that I want to use to cover the stand with, but it says not to apply it when the humidity is over 70%. I live in Portland, and it seems like it’s been raining almost continuously for the past six months. It’s 65% right now and the forecast calls for rain all week, so it may be a little while before I can get it finished in the Duratex. I’d briefly considered staining it or covering it with graffiti or stickers or some other finish, but I think basic black Duratex paint will match the cabs better and will hold up better after some road wear. I’ll probably go with it bare for Friday’s gig and see what the band says, then I’ll likely paint it with the Duratex on Saturday, which should give it plenty of time to dry before the next weekend. I’m hoping that the high humidity doesn’t mess up the texturing too much.
, but often seems almost too tall. Also, as an adjustable stand, it has a tendency to feel rickety.I do like to use a cabinet stand. I mainly play in small bars on tiny stages and am frequently forced to stand literally right in front of my amp. Being somewhat tall (6’3”
, this positions the cab drivers to face the back of my knees. Since my bass is not run through the PA (small club), I have a tendency to turn the bass up when I can’t hear it as well as I’d like, and it thus gets to be too loud in the mix. I like a lot of bass in my mix. So a cabinet stand gets the cab up closer to my ears and helps me hear the bass better. While I lose a tiny bit of deep bass from moving it away from the floor, I can easily compensate for that with my EQ.I’m not what you would call an “experienced woodworker,” but I do have a drill press, table saw, router, etc. and know how to use them, and I’ve built some things before, so I decided last week to have a go at making a better cabinet stand. I found a whole bunch of select solid poplar 1”x2” and some poplar 2”x2” pieces left over from another project, as well as some scraps of ½” thick plywood in good shape, so I didn’t have to spend a lot of money either.
I spent a while thinking about what I wanted in a stand, and decided that I’d like it to be taller (18” or so), lighter weight, but still just as sturdy as the first one, and that I would like it to have a power supply on the back. I don’t carry a power conditioner in my rack, and I thought it would be nice to mount a Furman power block on the back for all my gear to plug into. I also wanted to leave the front open so I could use the area under my cab for storage (space on those tiny stages is at a premium!). I’ve asked the drummer (graphic artist) to make a tapestry or something with one of the band logos to hang over the opening, and that will cover the front of the unit.
I began by cutting out a piece of plywood to match the footprint of my largest cab – which turned out to be 23” wide by 16” deep. Then using #10 screws, I attached a rim of 1”x2” poplar, arranged vertically, around the edge of the top plywood piece. Once the top was done, I cut out the “legs” of the stand from 2”x2” poplar, making them 18” long, which gave me a total height of just under 19” for the stand. With a Auralex Gramma Pad (fits perfectly on top), it can be 21” tall.
Once the legs were done I ran another rim of 1”x2” poplar (again arranged vertically) around the base of the legs to secure them. I rounded the edges of these poplar pieces over with a router so they could serve as “handles” when the stand is upside down (i.e. in transport). Then I screwed in another piece of 1”x2” poplar across the back to give me a place to mount the Furman. Using some scraps, I built up some pieces so that I could recess the Furman into the back somewhat (so it didn’t stick out much), and I used a brass corner brace (which swivels on a screw) to secure the Furman onto the screw mounts I made.
Lastly, I attached some plywood pieces (rounded over with the router) to make the back and sides. Here are some pics from after I’d finished the basic assembly, but before I’d filled in the countersunk screw holes and cracks and started sanding, showing the robust construction using screws:
Looking at the front:
Looking at the back:
Then I filled in the screw holes and cracks with wood putty, sanded it down, and attached some rubber feet to the top and bottom.
Here’s how it looks now:
From the front:
Showing the mount for the Furman on the back:
With the Furman installed:
Showing the Furman recessed:
Showing the top, looking at the back:
Upside down, ready for transport:
With a cab on top, and the old stand next to it:
I have some Duratex paint that I want to use to cover the stand with, but it says not to apply it when the humidity is over 70%. I live in Portland, and it seems like it’s been raining almost continuously for the past six months.
It’s 65% right now and the forecast calls for rain all week, so it may be a little while before I can get it finished in the Duratex. I’d briefly considered staining it or covering it with graffiti or stickers or some other finish, but I think basic black Duratex paint will match the cabs better and will hold up better after some road wear. I’ll probably go with it bare for Friday’s gig and see what the band says, then I’ll likely paint it with the Duratex on Saturday, which should give it plenty of time to dry before the next weekend. I’m hoping that the high humidity doesn’t mess up the texturing too much.

 My new stand weighs about 17 with the Furman on it, and is a few inches taller. The one in the back is also a shallow rack, and thus not really deep enough to use as a stand anyway without the covers on.